Course
The Royal Queensland Golf Club was founded in 1920 by a group of prominent citizens of Brisbane who obtained a lease of land occupying 420 acres (in today’s terms 170 hectares) – since reduced to around 266 acres (108 hectares) – fronting the Brisbane River in an area known as Parker Island.
The original course was designed by Carnegie Clark, the Australian Open Champion of the day, and was opened by the Governor-General Lord Forster in 1921. It is said that he had a handicap of +3.
The services of the eminent Scottish golf architect Dr Alister MacKenzie were later retained during his visit to Australia in 1926. The following extracts from the report which he prepared during that visit give some indication of the nature of Royal Queensland:
“The ground is excellently adapted for the construction of a golf course which might even compare favourably with some of the British Championship courses. The part of the ground for which the main course has been chosen is full of very fine golfing features. Although the ground at first sight appears flat, yet it is full of minor undulations of a somewhat similar character to famous seaside courses like St Andrew’s. In conclusion, I must say that the course at Hamilton should have a very great future, and not only be an excellent test of golf, but extremely popular to all classes of players.”
His major focus was greens and bunkers, with the short 8th hole (pre 2007) providing an excellent example of his work and design philosophy.
Royal Queensland has hosted three Australian Open Championships and four Australian Amateur Championships, as well as a multitude of other significant professional and amateur events.
Construction of the new Championship Course was completed in December 2007 and it is currently rated the 22nd in Australia. The new Royal Queensland layout was designed by Michael Clayton, following the State Government’s decision in 2005 to build a second Gateway Bridge over the famous course. Michael Clayton describes the new layout and the philosophy of the design as follows:
“Royal Queensland is a course that was designed to place an emphasis on strategic golf. The width and space afforded the golfers from the tee gives them every opportunity to decide for themselves where best to play.
There are very few shots on the course where the architecture dictates where the golfer must play. At most of the two and three shot holes the test from the tee is of accurate driving to position as opposed to simple straight hitting.
The majority of the greens are arranged so the player is presented with a preferred line of play into the flag and those playing from the non-preferred side are likely to face a quite different shot and one that is more difficult.
The most highly rated courses in the world are based on strategy and providing choices for golfers, rather than dictating that there is only one way to play a hole. The Old Course at St Andrews is still perhaps the best course in the game. Certainly, it is the most interesting and consequently the most fun to play. No shot there is dictated to the player and there are multitudes of options for all players, no matter their handicap, to consider.
Whilst Royal Queensland looks nothing like the Old Course at St Andrews, there are similarities in how they play and the questions they ask. Neither course employs long grass as a penal hazard, the fairways are wide, and offer a variety of lines from the tee. Bunkers are used as centre-line hazards rather than simply putting them down the sides of the fairways and asking players to hit between them.
There are difficult bunker shots at Royal Queensland, especially around the greens, and the bunkers are a significant part of the defence of the golf course. Not always will the player be afforded a perfect lie or a perfectly ‘fair’ shot. Some think that unreasonable, but bunkers are hazards that ought to deliver somewhat random forms of punishment. The odd difficult shot gives the better player an opportunity to show off skills others have not developed. They also give those who have not developed those skills a chance to add another dimension to their game.
Alister MacKenzie the great Scottish architect and a lover of The Old Course at St. Andrews had visited the original course at Royal Queensland and he was a designer who spoke of, and built, courses that stimulated players to improve their game. He railed against the use of long grass as a hazard and one only has to play his courses to see how much emphasis he placed on asking the player how best to play the hole. He also spoke of players growing bored with the game without really understanding why. It was, he said, because the courses they played were not real courses at all and they lacked any semblance of strategy.
Royal Queensland is not a course where players will grow bored. The best lines to take from the tees and the best shots to play vary from day to day depending on the wind, the position of the flag, the state of one’s game and the state of a match. That is the essence of making the game interesting on more than just a superficial level and Royal Queensland is a course that captures that spirit.”
Michael Clayton
Designer of the Royal Queensland Golf Course
Course Tour
| Tee | Par | Distance | ACR/AWCR |
|---|---|---|---|
| Black | 72 | 6443 m | 74 |
| Blue | 72 | 6148 | 73 |
| Red | 72 | 5432 m | 73 |
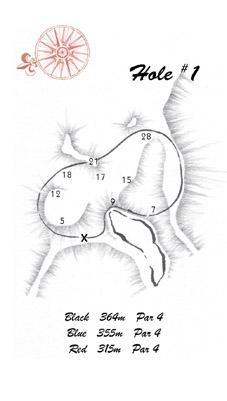
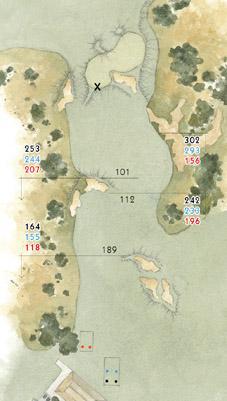
HOLE 1
A fairly gentle introduction to the New Course at Royal Queensland. From the tee the only real trouble on this hole is the out of bounds down the left hand side.
The driving area is very generous. The secret of this hole being to select the right club for the second shot. The elevated green makes club selection quite difficult, with the player generally requiring at least one club longer than the distance would indicate.
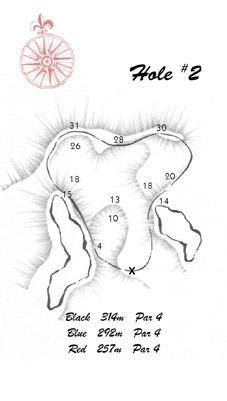
This short Par 4 is drivable by the very long hitter in favourable conditions.
The preferred line from the tee is centre, or right of centre of the fairway, depending on the pin position. Any shot beyond the green will require a high quality recovery shot to the green which slopes quite steeply from back to front.
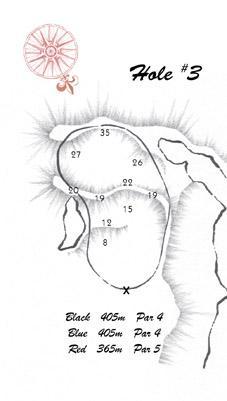
HOLE 3
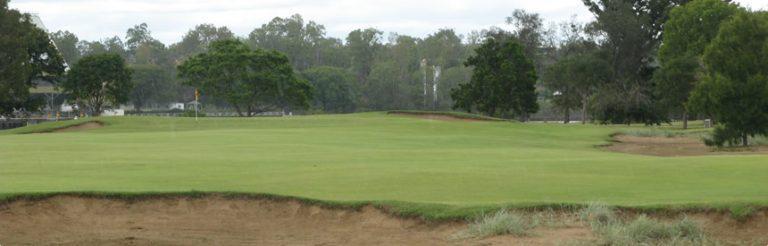
HOLE 3
This short Par 4 is drivable by the very long hitter in favourable conditions.
The preferred line from the tee is centre, or right of centre of the fairway, depending on the pin position. Any shot beyond the green will require a high quality recovery shot to the green which slopes quite steeply from back to front.
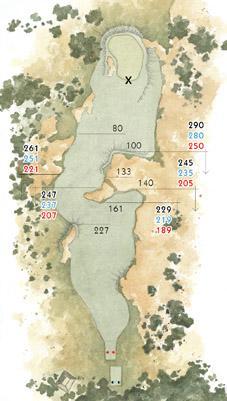
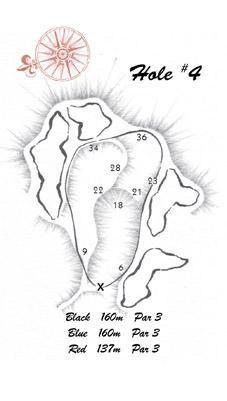
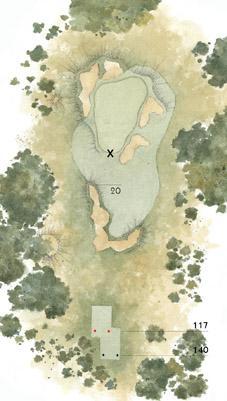
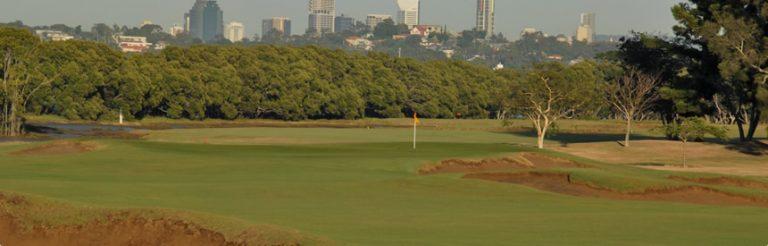
HOLE 4
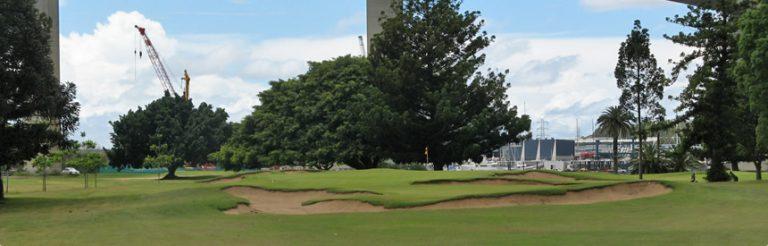
This medium length Par 3 normally plays into the prevailing wind.
A very long green of some 36 metres from front to back makes club selection quite critical. This green also has severe drop-offs at the rear.
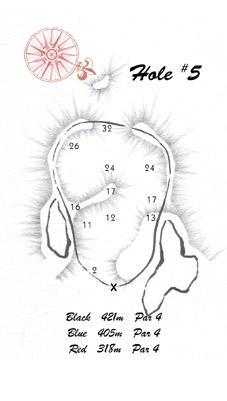
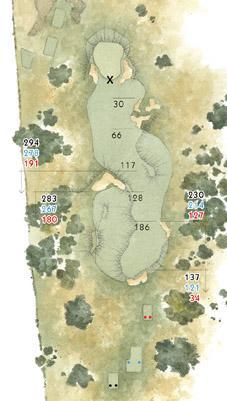
HOLE 5
The 5th is an interesting hole – probably more interesting than it appears at first glance.
It has a very wide fairway, but only a narrow strip of fairway to hit if the player is to have the ideal second shot. Anything too far right results in a very difficult angle across the greenside bunkers, and anyone left and short of the large fairway bunker faces a blind shot, albeit with a much better angle. Only the perfect drive onto the high ledge of fairway just right of the large fairway bunker earns the golfer the combination of a clear view and line. It is an easy hole to hit the fairway, but it takes an accurate and well thought-out tee shot to provide the best second shot option.
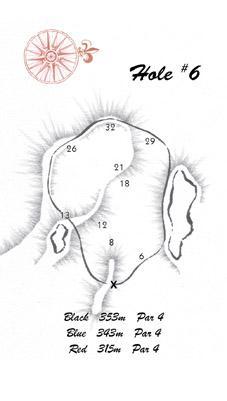
HOLE 6
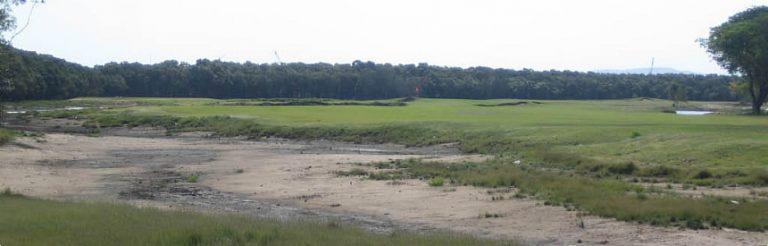
The second of the three holes which adjoin the Brisbane River.
The left hand side of the hole is defined by a tidal saltwater wetland area, and water is in play from the tee on the right on the preferred driving line. The best approach is one where the golfer does not have to contend with the small and very difficult pot bunker at the left front of the green.

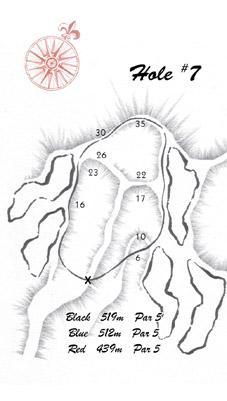
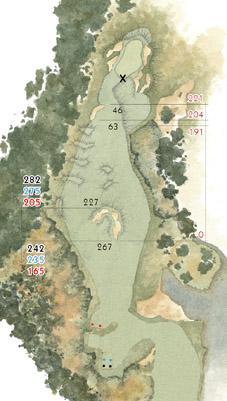
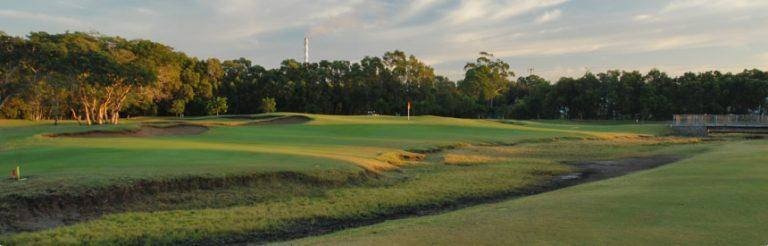
HOLE 7
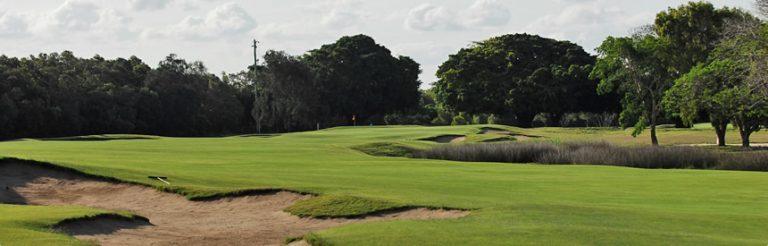
On the tee the golfer sees a wide expanse of fairway on either side of the large bunker complex in the middle of the fairway, with the left hand side defined by tidal wetlands.
It is after the drive however where this hole becomes much more interesting. For the second shot, the left hand side of the hole is guarded by a Hazard, and the majority of the right hand side is bordered by wetlands. The further one progresses towards the green the narrower the landing area becomes, and the more the hazards come into play. This green provides some of the most demanding putting on the golf course.
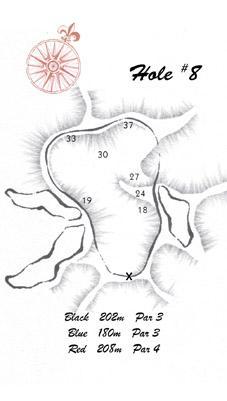
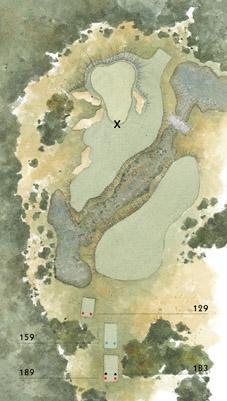
HOLE 8
This long Par 3 is the most demanding of the short holes on the golf course.
No matter which Teeing ground is in use, the player has to contend with carrying the water hazard which runs diagonally across the fairway in front of the green, and continues all the way up the right hand side of the hole. It is also necessary to avoid the nest of bunkers to the left of the green. Par on this hole is a very good score.
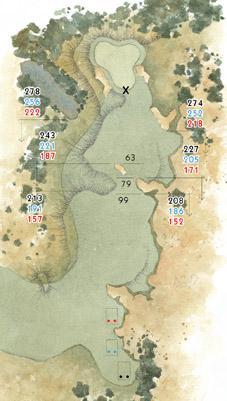
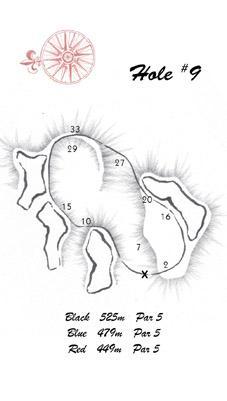
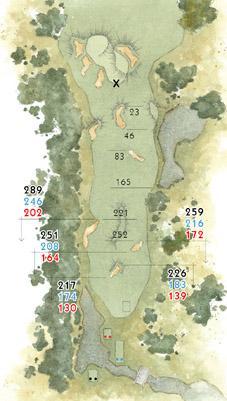
HOLE 9
This Par 5 is a classic example of the situation which exists on many holes where the placement of bunkers forces the player to make decisions about how best to navigate his or her way to the green.
The major danger from the tee is the hazard down the left hand side, but once the golfer clears the driving area, the right hand side – which is the preferred angle of approach to the green – is protected by water.
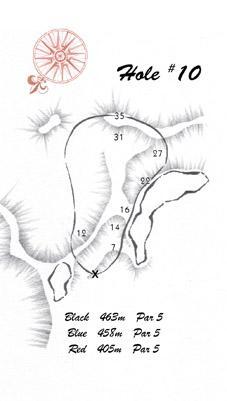
HOLE 10
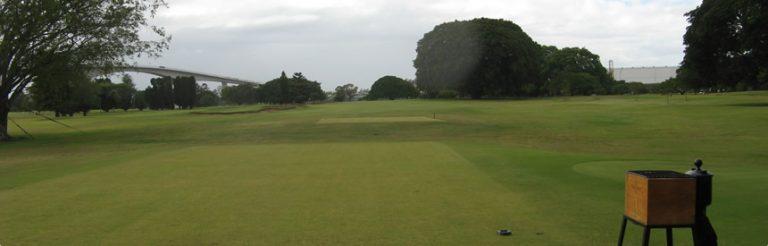
A genuine birdie chance for the longer hitter.
The drive has to avoid the bunkers on the left hand side and the large fig tree guarding the right hand side of the fairway. The longer hitters can reach the green with their second shot, but for those choosing not to go for the green, the best approach up the angled green is from the left hand side. It is a difficult two shot hole for the long hitter, but a moderately easy Par 5 for the average golfer.
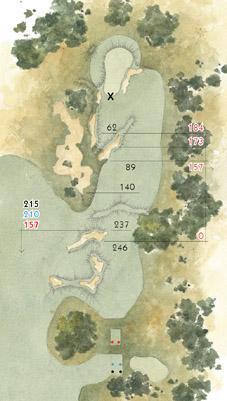
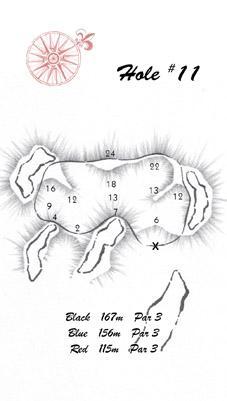
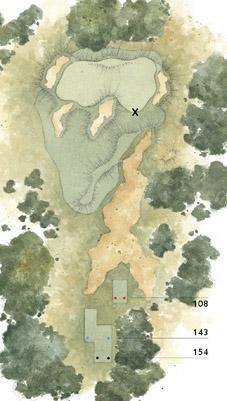
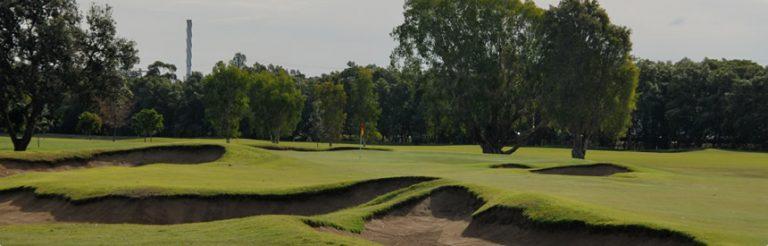
HOLE 11
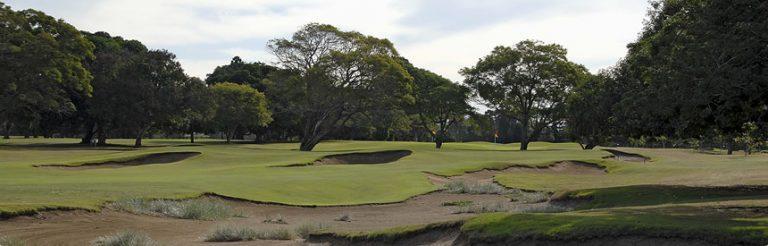
This hole requires a very precise mid-iron to find the wide but very shallow elevated putting surface.
An errant shot short, left, or right of the green will find deep bunkers, while the sharp drop off over the back of the green makes an up and down from that position quite demanding.
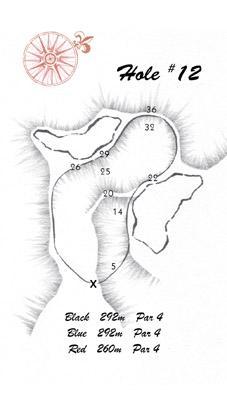
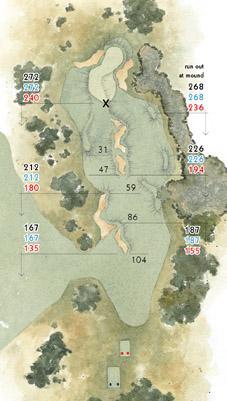
HOLE 12
This short Par 4 offers the golfer a range of options. It can be legitimately played with any one of a number of clubs from the tee, with the preferred line from the tee very much dependent on the wind and pin position.
The green is reachable for the longer hitters provided they can hit a very accurate tee shot down the left hand side. For those taking the more conservative approach, a no less precise tee shot is required to avoid the fairway bunkering and the water which runs all the way up the right hand side of the hole from the landing area to the green. Accuracy and distance control is also paramount with the approach to the green, where the contours can make for some ‘interesting’ putting.
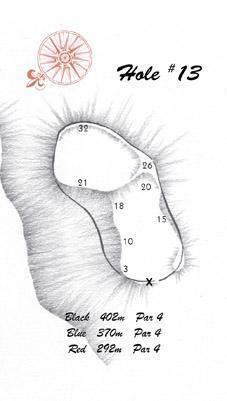
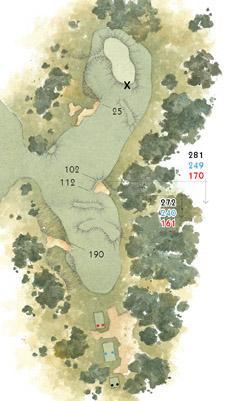
HOLE 13
The best line from the tee on this hole is to the right of centre of the fairway.
The closer the player drives to the right hand bunker the better the line into the flag. The further left the tee shot is, the poorer the angle, with the shot rendered blind by the fairway bunkers on that line to the green. Although there are no greenside bunkers, the approach shot missing the green will provide a severe test for a golfer’s short game.
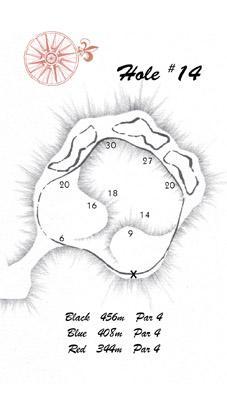
HOLE 14
A long Par 4 requiring accuracy from the tee.
Left of centre is the best position for the drive to avoid the large fig tree which defines the corner of the dog leg. The approach shot to the green is made more interesting by a depression just short of the green which is not visible from the fairway, making the approach shot appear much shorter than it really is. Any shot missing the green left, right, or long, will provide the golfer with a very demanding recovery shot from deep rough or sand.
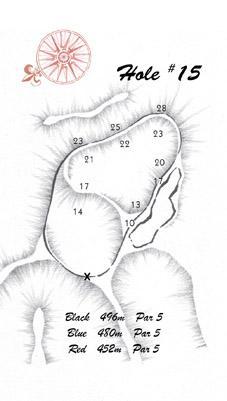
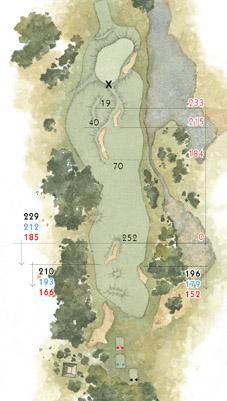
HOLE 15
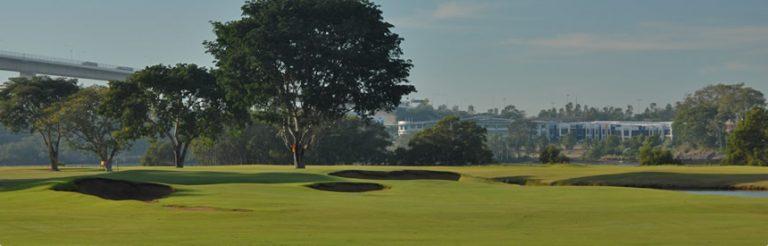
The last Par 5 is a very challenging hole which provides every player with a ‘risk V reward’ decision.
The drive must avoid the fairway bunkers, as must the second shot which ideally should be down the left side of the fairway to give the golfer a clear view up the length of the green. Water is a factor all the way down the right hand side of this hole.
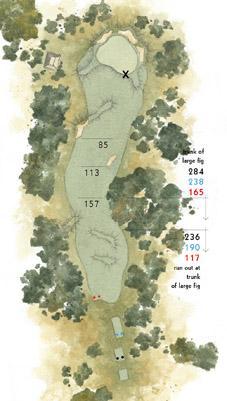
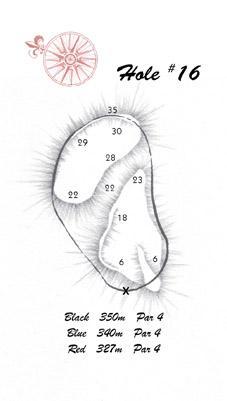
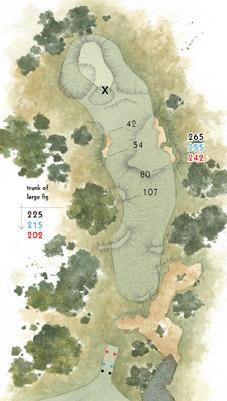
HOLE 16
The drive on this hole should be to the right centre of the fairway to ensure that the large fig tree on the left at the dog-leg does not come into play for the second shot.
This green demands a very precise approach shot. It is severely contoured and is basically two greens in one. This is only the second green with no greenside bunkers, but the run-offs and contours of the green will examine all a golfer’s skill and imagination.
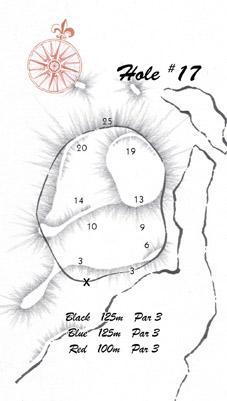
HOLE 17
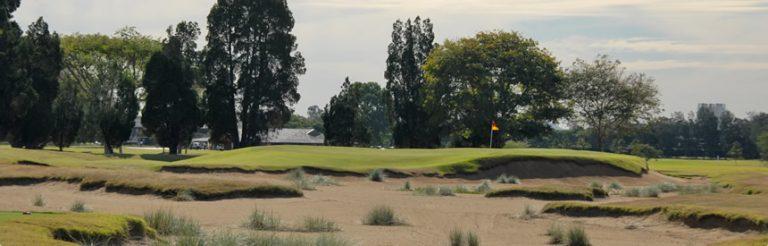
One of the signature holes on the course, although only a short Par 3, the tee shot must carry wasteland all the way from the tee to the elevated green.
This hole has already played a major role in deciding some major tournaments with players needing to judge their tee shot perfectly with consideration to the exposed green that is affected by varying winds. The two distinct tiers on this green also provide some putting challenges.
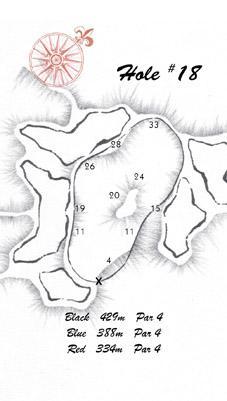
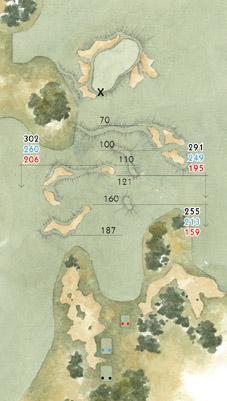
HOLE 18
A long Par 4 to finish this Championship layout. The fairly generous driving area should enable the golfer to avoid the bunkers down the left hand side of the fairway.
The drive however, must still be positioned to give the player the best approach to the pin set for that particular day. The relatively shallow green runs away from the golfer from left to right and is surrounded by bunkers.